Thursday, July 26, 2012

It's Possible - an old toolbox becomes a make-up caddy.

This is another post about taking something originally used for one purpose - and repurposing it with very little work.

At an estate sale a couple of years ago I acquired this really cool tool box. The drawers have the ball bearing mechanism so they move nicely and can be fully extended to see all the way to the back of the drawer.

At the time I wasn't sure what I would do with it - something that my poor husband is beginning to deal with (he just smiles and moves on.)

I thought about all the places where I use 'small tools' or 'instruments.' The toolbox is heavy (even empty) and the leather handle on the lid is not in the best shape so I didn't want it to be mobile - it would have to be a stationary piece.

I seriously considered the kitchen but, I already have containers where I store those items I use the most (that will be a separate post) so, the logical spot was the bathroom (I know - I just used the word logical - let it go).

At that time I shared a bathroom with the kids - the master bath only had a shower and small vanity and I needed a tub and more storage space so I just had to live with digging the toys out of the tub every time (and the toothpaste in the sink and the towels on the floor and the random 'experiements' my son always has brewing...... never mind, I'm sure you understand).

Putting the toolbox on the vanity in that house was a little more tricky, in our new house I have a nice space between the double sinks and I'm so happy with the way it is displayed.
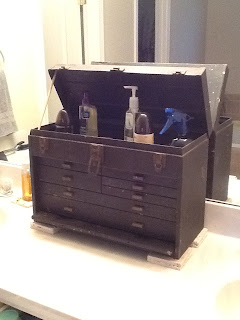
I keep some essentials in the top of the
toolbox and keep it propped open
with a thin dowel.
One of the issues about repurposing an item like this is cleaning it. I didn't want to remove too much of the patina that made it so cool - but-it-was DIRTY! Also, it smelled like a garage - oil, dirt, grease. I just tried to do my best - I just used gentle cleaner and a rag. Inside the drawers I placed dryer sheets to help with the smell - and I sprayed fabric freshener inside the drawers that were lined with felt.
A view of the toolbox with
some of the drawers open.
The other issue was the concern of having something metal sitting on a vanity that does get wet. I solved that by using some travertine tiles I had just purchased at one of the home improvement stores to use as coasters (not upcycling, but pretty creative nonetheless - an idea stolen from another blog I'm sure).

Now, the toolbox is up off the surface of the vanity. If the toolbox does get wet and rust forms, it is on the tiles and not the vanity - a detail that is not lost on my husband I assure you :)


I used two tiles for each corner of the
toolbox - so eight total. Notice, one of the
tiles also under the soap dispenser as well.
I just love the look of the raw stone
and it absorbs water very well so the
bathroom is a good place to use it like this.
 Putting something like this in a bathroom is unexpected, and interesting. My favorite part is that the toolbox is still being used. This is a great piece and all the drawers still work perfectly - the thought of it in a landfill makes me sad and a little angry.

So, what do you have in your garage or basement that you could repurpose for some other use? Look around, be creative, that's what Upcycling Life is all about!

Tuesday, July 24, 2012

I love you, a bushel and a.......... crate!

I was knocking around on Pinterest the other night (okay - EVERY night) and I kept seeing these beautiful built-in looking cabinets that people had at the end of their spa tubs.

Well, we recently moved, and we now have a beautiful huge bathroom with one of those wonderful spa tubs! Yay! (kind-of).

What we are lacking is storage. It is strange to complain about moving into a larger house and not having enough storage, but it is true. Over the double sink vanity is one of those huge mirrors (and yes the contractor special Hollywood light bar). So, there are no medicine cabinets, which we really need.

I looked at the local box-stores and didn't see any pre-fab shelves I liked that would fit at the end of the tub - most were not wide enough and/or too deep for the space.

Then I saw something else on Pinterest (see a trend here?) a bookshelf made from wood crates.

"I HAVE some of those!" the voice in my head screamed.

(Actually, if I remember correctly, it was pretty late at night and I think I might have accidentally used my 'outside my head' voice and woke up my husband........ maybe.)

Anyway, below is what I came up with. I plan to add more baskets and containers to hold more items as I unpack (yes, I'm not unpacked yet - hey we have only been in our house for a month - I still have a couple of years right?).

The point of all of this is that (in my opinion) upcycling doesn't have to be a major undertaking. It can be as simple as using something you already have in a different or unexpected way to solve a problem. I didn't have to buy or make anything 'new' for this project and that made me feel quite content.


The crate on the bottom left hangs
over a couple of inches, but I'm okay
with it - I love the look.


The two crates on the bottom are book crates
I rescued when I was stationed in Germany
20 years ago. They are very sturdy and at
some point in the past I put shelves in
Them. The other two crates are
fairly flimsy ones I acquired through
the years, but they do the job just fine.
And, yes those are box-store lotion-pump-
dispensers holding my shower gel, shampoo
and conditioner - but that is not upcycling so
pretend you didn't see those :)


Monday, July 23, 2012

Take a chance on me.....


***Update, the photos I promised are now in the blog.
Fake 'leading' on the glass doors.


I recently purchased a maple china cabinet at an auction for - wait for it - $25!

But, what was I going to 'do' with it. (A question my husband had immediately.)

I already have a mid-century china cabinet in my great room that I love. This thing was obviously made somewhere between 1980 and........ 1980. I hated everything about it - the finish, the lines, the glass doors with the fake 'leading' painted on. (If you have one of these in your home and you love it - um..... I can help you paint it.....)


Too small!

I am really in need of some more jewelry storage. The jewelry armoire I bought in 2001 is now way to small for my costume jewelry collection (hey I do theater, I need all that stuff!!) You know the kind of armoire - the one everyone went out and bought at the box stores with the flip open sides and top. Of course I took mine home and immediately painted it black enamel and put Asian Kanji on the sides to go with my Asian themed bedroom I had at the time - but it is now the wrong color, theme and size.

So - why not a jewelry (china) cabinet!?


Need room for everything in the
baskets and shoe boxes - and some
stuff not even in the photo.

Though I had every intention to begin this project on Saturday, I didn't get to it until Sunday afternoon. I had two hours to work on it between other 'events' so I put on my grubbies and got to work. With my husband's help I managed to get all the hardware and doors off, sand it lightly and get a coat of primer on the top part, the 'hutch.'


Make sure you use some type of rag and
wipe your piece down after you sand it.
(This is the sleeve from an old T-shirt
talk about recycling!)If you are
spreading primer on a dirty surface
it won't stick as well.


I don't go crazy with sanding, because I use Kilz as the primer - this stuff is amazing. For this project (since I am working on it in my bedroom) I am using water based Kilz. However, if you can stand the smell the oil based Kilz is the best and will make the paint stick better and last longer. The water-based stuff also dries faster, so if you are working on a timeline that might be good to know.


When I get a little further along in the project I'll update with more photos, tips and of course any problems I encounter (besides the issue that this is in my bedroom and I'm going to have to walk aorund it until I get it finished.) 


Some of the hardware I
removed - not much of this
will be going back on the
finished piece!


The cabinet with all the hardware and doors
off.


The hutch with a coat of Kilz.


The doors of the lower
cabinet (that are going
back on the piece) with a
coat of primer. That door
in the center on the lower
cabinet is fake, it does notopen
- very frustrating.


Some of my 'tools' in a very handy caddy.
I am in need of some new 1 1/2 inch and 2
inch brushes - but I like to keep art brushes
in here too - they are very usefull for detail work.